徐麟家的博客

站在巨人的肩膀上

欧拉变换

由瑞士数学家欧拉提出,主要描述3d空间中对物体的旋转。比如 x轴旋转30°,y轴旋转0°,z轴旋转60°,把这三个组合到一起,对一个3d空间中的物体做一定的旋转(注意:旋转是有一个既定的顺序的,比如 y->x->z)。

万向锁

在unity中出现万向锁的问题:设置x旋转90°,y和z只能旋转同一个方向。

万向锁的问题是欧拉变换在某些特定的角度,产生一个维度的丢失!主要是因为欧拉旋转的机制是存在层级关系,预先定义的旋转顺序(y->x->z),在旋转y的时候x轴和z轴的指向会一起变化,在x旋转的时候只有z轴会跟着变化(x轴在上一步已经操作过了,不影响了)(某个特定角度)导致z和之前的x轴的指向一致时,z轴无论如何旋转都是和x一样的方向,即维度丢失。

介绍下上图的视频:虽然用户拖动先假定了x是定格在90°,然后去旋转y和z。但是实际欧拉变换描述的是一种状态,并不是当前情况下的旋转,它还是按y->x->z这样的顺序执行的。先让y旋转了任意θ角度之后,再旋转x轴90°(或者-90°),这个时候z轴会跟着x的旋转正好和y轴的方法重合了,在旋转z轴等于是在旋转x轴,一个维度丢失了。
在实时渲染中通过公式对其解释
yxz三个轴上的旋转可以表示为三个矩阵相乘的形式 (注意有顺序哦,矩阵乘法是不满足交换律的)。具体解释如下

特殊的矩阵变换和操作

万向锁有什么办法解决?

欧拉变换中无法解决,只能尽可能的避免,第二个顺序旋转轴(这里是x)尽可能避免90°(-90°)的旋转。
如果要彻底解决万向锁问题,只能换一个方式–四元数

什么是DrawCall?

drawcall是渲染一个物体所需要的指令集,由CPU像GPU发送,drawcall中会包含GUP渲染物体所的,  
如模型顶点数据,法线,纹理贴图等等渲染相关数据。cpu在发送指令期间是不能做其他事情的,这就形成主要的性能瓶颈之一。

推荐下方很有趣的学习资料链接

Render Hell – Book I

什么是Batching?

由于太多的drawcall,自然会有降低drawcall的说法。在unity中称为Batching,简单说就是通过一定的规则合并drawcall的技术,从而减少渲染调用的次数。

介绍Unity中的主要Batching技术

  1. Dynamic Batching:这是一种古老的技术,目前很多引擎都是支持的。主要的原理是合并通用相同材质(material)的小的网格(meshes)变成一个打的网格,替代原先的多个渲染调用。因此这项技术不适用网格顶点多的模型,比如球迷可能就需要谨慎考虑该技术了。 Static batching 的原理Dynamic Batching类似,只不过是在运行渲染前已经合并好,不像Dynamic是运行时即时合并的。

  2. SRP Batcher:这是Unity 2017.1版本引入的新技术。SRP Batcher不会减少Drawcall调用而是把他们变得精简,它会缓存某些渲染状态(材质,颜色,顶点等等)到GPU的某块内存中。所以就没必要把每一个drawcall都发送给GUP。但是对shader编写需要遵循严格的结构规则。比如需要在属性声明中按如下约定规则的结构体。

    1
    2
    3
    cbuffer UnityPerMaterial {
    float _MainColor;
    };
  3. GPU Instancing :单个drawcall一次渲染相同的网格(meshes)。需要把带渲染的数据包装成数组,一次性发送给GUP,GPU会遍历这个数组按照次序渲染所有的物体。当然shader的编写结构上会更加严格。在顶点和片元着色器上会多增加一个UNITY_VERTEX_INPUT_INSTANCE_ID,用来对应数据块的内存位置。下面我写了个例子看渲染1000+个物体,使用GPU Instancing只需要3个drawcall。

1.本文内容概述

拓展ScrollRect组件相关内容,当ScrollRect的Conenct没有超过ScrollRect的大小不需要拖动;否则,可拖动。

2.代码分析

代码需要比较 ScrollRect的sizeDelta和Content的sizeDelta进行比较。当Content的宽度(高度)大于Content的宽度(高度)时,则需要拖动;反之亦反。
监听UIBehaviour.OnRectTransformDimensionsChange事件,当Context发生改变需要重置。

3.代码展示

UIScrollDragAdapter.cs
1
2
3
4
5
6
7
8
9
10
11
12
13
14
15
16
17
18
19
20
21
22
23
24
25
26
27
28
29
30
31
32
33
34
35
36
37
38
39
40
41
42
43
44
45
46
47
48
49
50
51
52
53
54
55
56
57
58
59
60
61

using UnityEngine;
using UnityEngine.EventSystems;
using UnityEngine.UI;

namespace Rainbow.UI
{
/// <summary>
/// 根据Context的bounds,自动判断ScrollRect 是否可以滑动!当检测的几何框大小发生变化的时候会重新计算
/// 以Vertical为例当高度小于ScrollRect的高度,锁定垂直方向上的滑动
/// *要点1、必须挂在需要检测RectTransform变化的GameObject上 Content上
/// *要点2、设置 scrollRect
/// *要点3、设置 dragDir
/// </summary>
[RequireComponent(typeof(RectTransform))]
public class UIScrollDragAdapter : UIBehaviour
{
public ScrollRect scrollRect;
public DragDir dragDir;
RectTransform rectTransform;
RectTransform scrollRectTransform;

public enum DragDir
{
Vertical,
Horizontal,
}

protected override void Start()
{
rectTransform = GetComponent<RectTransform>();
if (scrollRect != null)
{
scrollRectTransform = scrollRect.GetComponent<RectTransform>();
}
OnRectTransformDimensionsChange();
}
protected override void OnRectTransformDimensionsChange()
{
if (rectTransform == null || scrollRectTransform == null)
{
return;
}
Bounds bounds = RectTransformUtility.CalculateRelativeRectTransformBounds(scrollRectTransform, rectTransform);

if (dragDir == DragDir.Vertical)
{
bool dragv = bounds.size.y > scrollRectTransform.sizeDelta.y;
scrollRect.vertical = dragv;
}

if (dragDir == DragDir.Horizontal)
{
bool dragh = bounds.size.x > scrollRectTransform.sizeDelta.x;
scrollRect.horizontal = dragh;
}
}

}
}

4.效果演示

1.本文内容概述

对于原版本的Button添加按钮缩放比较困难的问题,开发了一个基于dotween的缩放按钮统一插件功能。

主要解决的痛点

  1. Button使用Animation实现各种效果,动画必须要求各个按钮节点相同。
  2. Button的效果比较重量级,对程序来说不好维护
  3. Button不是很灵活,一般游戏工程的按钮比较简单和统一,不需要如此庞大复制的配置
    以上几点我开发了一个ScaleButton做完UGUI的补充插件。而且可以不断的按照此方法拓展新的功能。分析下UGUI-Button的一些源码,点击效果如何实现的效果的细节。添加一个拓展实现缩放功能(DoTween插件实现的),并且增加一个ScaleButton的编辑器脚本和一个快捷创建按钮的页签。

2.Button按钮的代码分析

Button的效果主要是Selectable类的DoStateTransition(SelectionState state, bool instant)方法控制状态的切换。

Selectable.cs
1
2
3
4
5
6
7
8
protected enum SelectionState
{
Normal, // 默认状态
Highlighted, //鼠标悬浮
Pressed, //点击
Selected, //选中
Disabled //禁用
}
我们只要实现这个方法,对应状态做对应的变化就行。

3.如何实现点击动画效果

使用doTween会让我们的工作变得简单。这里使用dotween的插件来做一个简单的缩放功能。

4.实现一个按钮缩放的功能的按钮–UIScaleButton

基于上面的分析我们创建UIScaleButton,重写DoStateTransition方法。

注意在OnDestroy时对Dotween进行删除

UIScaleButton.cs
1
2
3
4
5
6
7
8
9
10
11
12
13
14
15
16
17
18
19
20
21
22
23
24
25
26
27
28
29
30
31
32
33
34
35
36
37
38
39
40
41
42
43
44
45
46
47
48
49
50
51
52
53
54
55
56
57
using System.Collections;
using System.Collections.Generic;
using UnityEngine;
using UnityEngine.EventSystems;
using UnityEngine.UI;
using DG.Tweening;
using Unity.VisualScripting;

namespace Rainbow.UI
{
public class UIScaleButton : Button
{
[SerializeField]
public float m_ScaleUp = 1f;
[SerializeField]
public float m_ScaleDown = 0.95f;
[SerializeField]
Transform m_Target;

private float transScale = 1f;

Tween tween;

protected override void DoStateTransition(SelectionState state, bool instant)
{
base.DoStateTransition(state, instant);
switch (state)
{
case SelectionState.Normal:
transScale = m_ScaleUp;
break;
case SelectionState.Pressed:
transScale = m_ScaleDown;
break;
default:
transScale = m_ScaleUp;
break;
}
DoScale();

}

void DoScale()
{
Transform tweenTrans = m_Target ? m_Target : transform;
tween = tweenTrans.DOScale(Vector3.one * transScale, 0.3f).SetEase(Ease.OutBack);
}

protected override void OnDestroy()
{
base.OnDestroy();
tween.Kill();
}

}
}

另外为UIScaleButton添加一个编辑器脚本。

UIScaleButtonEditor.cs
1
2
3
4
5
6
7
8
9
10
11
12
13
14
15
16
17
18
19
20
21
22
23
24
25
26
27
28
29
30
31
32
using UnityEditor;
using UnityEditor.UI;
using UnityEngine;

namespace Rainbow.UI
{
[CustomEditor(typeof(UIScaleButton))]
[DisallowMultipleComponent]
public class UIScaleButtonEditor : ButtonEditor
{
SerializedProperty m_ScaleUpProperty;
SerializedProperty m_ScaleDownProperty;
SerializedProperty m_TargetProperty;
protected override void OnEnable()
{
base.OnEnable();
m_ScaleUpProperty = serializedObject.FindProperty("m_ScaleUp");
m_ScaleDownProperty = serializedObject.FindProperty("m_ScaleDown");
m_TargetProperty = serializedObject.FindProperty("m_Target");
}

public override void OnInspectorGUI()
{
base.OnInspectorGUI();
serializedObject.Update();
EditorGUILayout.PropertyField(m_ScaleUpProperty);
EditorGUILayout.PropertyField(m_ScaleDownProperty);
EditorGUILayout.PropertyField(m_TargetProperty);
serializedObject.ApplyModifiedProperties();
}
}
}

添加一个快捷创建UIScaleButton的选项。

UGUIExt_CreateObjectMenu.cs
1
2
3
4
5
6
7
8
9
10
11
12
13
14
15
16
17
18
19
20
21
22
23
24
25
26
27
28
using TMPro.EditorUtilities;
using UnityEditor;
using UnityEngine;
using UnityEngine.UI;
namespace Rainbow.UI
{
public static class UGUIExt_CreateObjectMenu
{
[MenuItem("GameObject/UI/ScaleButton - TextMeshPro", false, 2031)]
public static void AddButton(MenuCommand menuCommand)
{
TMPro_CreateObjectMenu.AddButton(menuCommand);

for (int i = 0; i < Selection.gameObjects.Length; i++)
{
string selectName = Selection.gameObjects[i].name;
if(selectName == "Button")
{
GameObject tg = Selection.gameObjects[i];
tg.name = "UIScaleButton";
GameObject.DestroyImmediate(tg.GetComponent<Button>());
tg.AddComponent<UIScaleButton>();
}
}
}

}
}

4.效果

unity使用packageManger方式创建需要依赖代码包。对我们想研究查看和修改UGUI源码很不方便,故想搭建一个可调试,修改UGUI源码的的unity工程。当然再实际开发中我们并不建议直接修改源码!

如何创建一个可调试可修改的UGUI源码工程?

  1. 创建一个unity工程
  2. 等初始化完毕后拷贝UGUI_CodeAnalyse/Library/PackageCache/com.unity.ugui@1.0.0文件夹至UGUI_CodeAnalyse/Packages/com.unity.ugui@1.0.0,请看下图
  3. 测试,脚本编辑器打开修改Button.cs中的Press()方法。
  4. scene中创建一个按钮,点击按钮,打印出日志”Hi I click”。

总结

通过以上的方式搭建的工程,可以修改,调试UGUI的源码,以验证我们的想法。

在一个空的scene,UGUI是如何创建一个Image组件的?

简单的介绍

  1. Canvas 画布,所有的UI显示元素必须在canvas中,Canvas 是UGUI组织界面的根节点。
  2. Image 创建的图片。
  3. EventSystem 事件系统,所有的点击,拖拽,按钮都是在这里处理完转发给UI组件的。

初始化的这部分代码都在MenuOptions.cs中,任何右键相关的创建命令都在这里编写,我们这里就看下Image的创建过程,其他都是类似的。

MenuOptions.cs
1
2
3
4
5
6
7
8
9
10
11
12
13
14
15
16
17
18
19
20
21
22
23
24
25
26
27
28
29
30
31
32
33
34
35
36
37
38
39
40
41
42
43
44
45
46
47
48
49
50
51
52
53
54
55
56
57
58
59
60
61
62
63
64
65
66
67
68
69
70
71
72
73
74
75
76
77
78
79
80
81
82
83
84
85
86
87
88
89
90
91
92
93
94
95
96
97
98
99
100
101
102
103
104
105
106
107
108
109
110
111
112
113
114
115
116
117
118
119

[MenuItem("GameObject/UI/Image", false, 2001)]
static public void AddImage(MenuCommand menuCommand)
{
GameObject go = DefaultControls.CreateImage(GetStandardResources());
PlaceUIElementRoot(go, menuCommand);
}

private static void PlaceUIElementRoot(GameObject element, MenuCommand menuCommand)
{
GameObject parent = menuCommand.context as GameObject;
bool explicitParentChoice = true;
if (parent == null)
{
parent = GetOrCreateCanvasGameObject();
explicitParentChoice = false;

// If in Prefab Mode, Canvas has to be part of Prefab contents,
// otherwise use Prefab root instead.
PrefabStage prefabStage = PrefabStageUtility.GetCurrentPrefabStage();
if (prefabStage != null && !prefabStage.IsPartOfPrefabContents(parent))
parent = prefabStage.prefabContentsRoot;
}
if (parent.GetComponentsInParent<Canvas>(true).Length == 0)
{
// Create canvas under context GameObject,
// and make that be the parent which UI element is added under.
GameObject canvas = MenuOptions.CreateNewUI();
canvas.transform.SetParent(parent.transform, false);
parent = canvas;
}

// Setting the element to be a child of an element already in the scene should
// be sufficient to also move the element to that scene.
// However, it seems the element needs to be already in its destination scene when the
// RegisterCreatedObjectUndo is performed; otherwise the scene it was created in is dirtied.
SceneManager.MoveGameObjectToScene(element, parent.scene);

Undo.RegisterCreatedObjectUndo(element, "Create " + element.name);

if (element.transform.parent == null)
{
Undo.SetTransformParent(element.transform, parent.transform, "Parent " + element.name);
}

GameObjectUtility.EnsureUniqueNameForSibling(element);

// We have to fix up the undo name since the name of the object was only known after reparenting it.
Undo.SetCurrentGroupName("Create " + element.name);

GameObjectUtility.SetParentAndAlign(element, parent);
if (!explicitParentChoice) // not a context click, so center in sceneview
SetPositionVisibleinSceneView(parent.GetComponent<RectTransform>(), element.GetComponent<RectTransform>());

Selection.activeGameObject = element;
}

//创建canvas
static public GameObject CreateNewUI()
{
// Root for the UI
var root = new GameObject("Canvas");
root.layer = LayerMask.NameToLayer(kUILayerName);
Canvas canvas = root.AddComponent<Canvas>();
canvas.renderMode = RenderMode.ScreenSpaceOverlay;
root.AddComponent<CanvasScaler>();
root.AddComponent<GraphicRaycaster>();

// Works for all stages.
StageUtility.PlaceGameObjectInCurrentStage(root);
bool customScene = false;
PrefabStage prefabStage = PrefabStageUtility.GetCurrentPrefabStage();
if (prefabStage != null)
{
root.transform.SetParent(prefabStage.prefabContentsRoot.transform, false);
customScene = true;
}

Undo.RegisterCreatedObjectUndo(root, "Create " + root.name);

// If there is no event system add one...
// No need to place event system in custom scene as these are temporary anyway.
// It can be argued for or against placing it in the user scenes,
// but let's not modify scene user is not currently looking at.
if (!customScene)
CreateEventSystem(false);
return root;
}
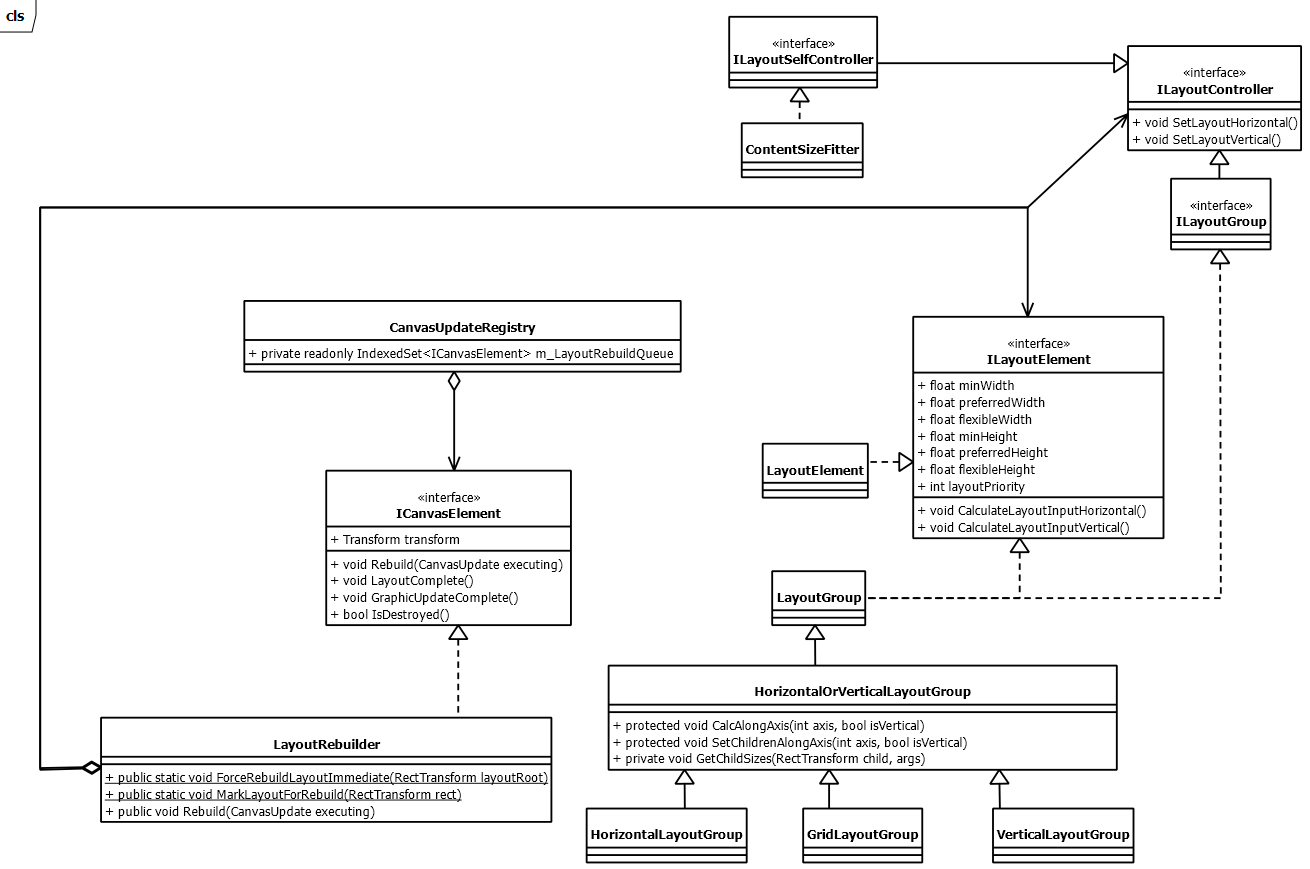

private static void CreateEventSystem(bool select)
{
CreateEventSystem(select, null);
}

//创建事件系统
private static void CreateEventSystem(bool select, GameObject parent)
{
StageHandle stage = parent == null ? StageUtility.GetCurrentStageHandle() : StageUtility.GetStageHandle(parent);
var esys = stage.FindComponentOfType<EventSystem>();
if (esys == null)
{
var eventSystem = new GameObject("EventSystem");
if (parent == null)
StageUtility.PlaceGameObjectInCurrentStage(eventSystem);
else
GameObjectUtility.SetParentAndAlign(eventSystem, parent);
esys = eventSystem.AddComponent<EventSystem>();
eventSystem.AddComponent<StandaloneInputModule>();

Undo.RegisterCreatedObjectUndo(eventSystem, "Create " + eventSystem.name);
}

if (select && esys != null)
{
Selection.activeGameObject = esys.gameObject;
}
}

简单画了下关于LayoutGroup的类图。

源码分析以及代码解释

1、CanvasUpdateRegistry 注册Rebuild 事件,Canvas从底层系统调用重新布局刷新方法 LayoutRebuilder.Rebuild(CanvasUpdate executing)。
2、LayoutRebuilder : ICanvasElement 是一个容器类对界面Rebuid请求进行封装。主要负责重建各种布局。
其中非常关键的方法代码:
LayoutRebuilder.cs
1
2
3
4
5
6
7
8
9
10
11
12
13
14
15
16
17
18
19
20
21
22
23
24
25
26
27
28
29
30
31
32
33
34
35
36
37
38
39
40
41
42
43
44
45
46
47
48
49
50
51
52
53
54
55
56
57
58
59
60
61
62
63
64
65
66
67
68
69
70
71
72
73
74
75
76
77
78
79
80
public void Rebuild(CanvasUpdate executing)
{
switch (executing)
{
case CanvasUpdate.Layout:
// It's unfortunate that we'll perform the same GetComponents querys for the tree 2 times,
// but each tree have to be fully iterated before going to the next action,
// so reusing the results would entail storing results in a Dictionary or similar,
// which is probably a bigger overhead than performing GetComponents multiple times.
PerformLayoutCalculation(m_ToRebuild, e => (e as ILayoutElement).CalculateLayoutInputHorizontal());
PerformLayoutControl(m_ToRebuild, e => (e as ILayoutController).SetLayoutHorizontal());
PerformLayoutCalculation(m_ToRebuild, e => (e as ILayoutElement).CalculateLayoutInputVertical());
PerformLayoutControl(m_ToRebuild, e => (e as ILayoutController).SetLayoutVertical());
break;
}
}

//深度优先,效果就是先把子类的布局好,再布局自己
private void PerformLayoutControl(RectTransform rect, UnityAction<Component> action)
{
if (rect == null)
return;

var components = ListPool<Component>.Get();
rect.GetComponents(typeof(ILayoutController), components);
StripDisabledBehavioursFromList(components);

// If there are no controllers on this rect we can skip this entire sub-tree
// We don't need to consider controllers on children deeper in the sub-tree either,
// since they will be their own roots.
if (components.Count > 0)
{
// Layout control needs to executed top down with parents being done before their children,
// because the children rely on the sizes of the parents.

// First call layout controllers that may change their own RectTransform
for (int i = 0; i < components.Count; i++)
if (components[i] is ILayoutSelfController)
action(components[i]);

// Then call the remaining, such as layout groups that change their children, taking their own RectTransform size into account.
for (int i = 0; i < components.Count; i++)
if (!(components[i] is ILayoutSelfController))
action(components[i]);

for (int i = 0; i < rect.childCount; i++)
PerformLayoutControl(rect.GetChild(i) as RectTransform, action);
}

ListPool<Component>.Release(components);
}

//深度优先,效果就是先把子类的布局好,再布局自己
private void PerformLayoutCalculation(RectTransform rect, UnityAction<Component> action)
{
if (rect == null)
return;

var components = ListPool<Component>.Get();
rect.GetComponents(typeof(ILayoutElement), components);
StripDisabledBehavioursFromList(components);

// If there are no controllers on this rect we can skip this entire sub-tree
// We don't need to consider controllers on children deeper in the sub-tree either,
// since they will be their own roots.
if (components.Count > 0 || rect.GetComponent(typeof(ILayoutGroup)))
{
// Layout calculations needs to executed bottom up with children being done before their parents,
// because the parent calculated sizes rely on the sizes of the children.

for (int i = 0; i < rect.childCount; i++)
PerformLayoutCalculation(rect.GetChild(i) as RectTransform, action);

for (int i = 0; i < components.Count; i++)
action(components[i]);
}

ListPool<Component>.Release(components);
}

3、ILayoutElement:包含自身各种布局相关参数的计算,最基础的布局元素:minWidth ,preferredHeight,minHight ,preferredHeight,layoutPriority 、、、、、。定义了两个重要的方法:
(a)CalculateLayoutInputHorizontal() 水平方向计算
(b)CalculateLayoutInputVertical() 垂直方向计算
4、ILayoutController:主要是对子节点进行布局。
(a) SetLayoutHorizontal()
(b)SetLayoutVertical()

示例

分析一个Horizontal Layout Group 布局相关的实例: 
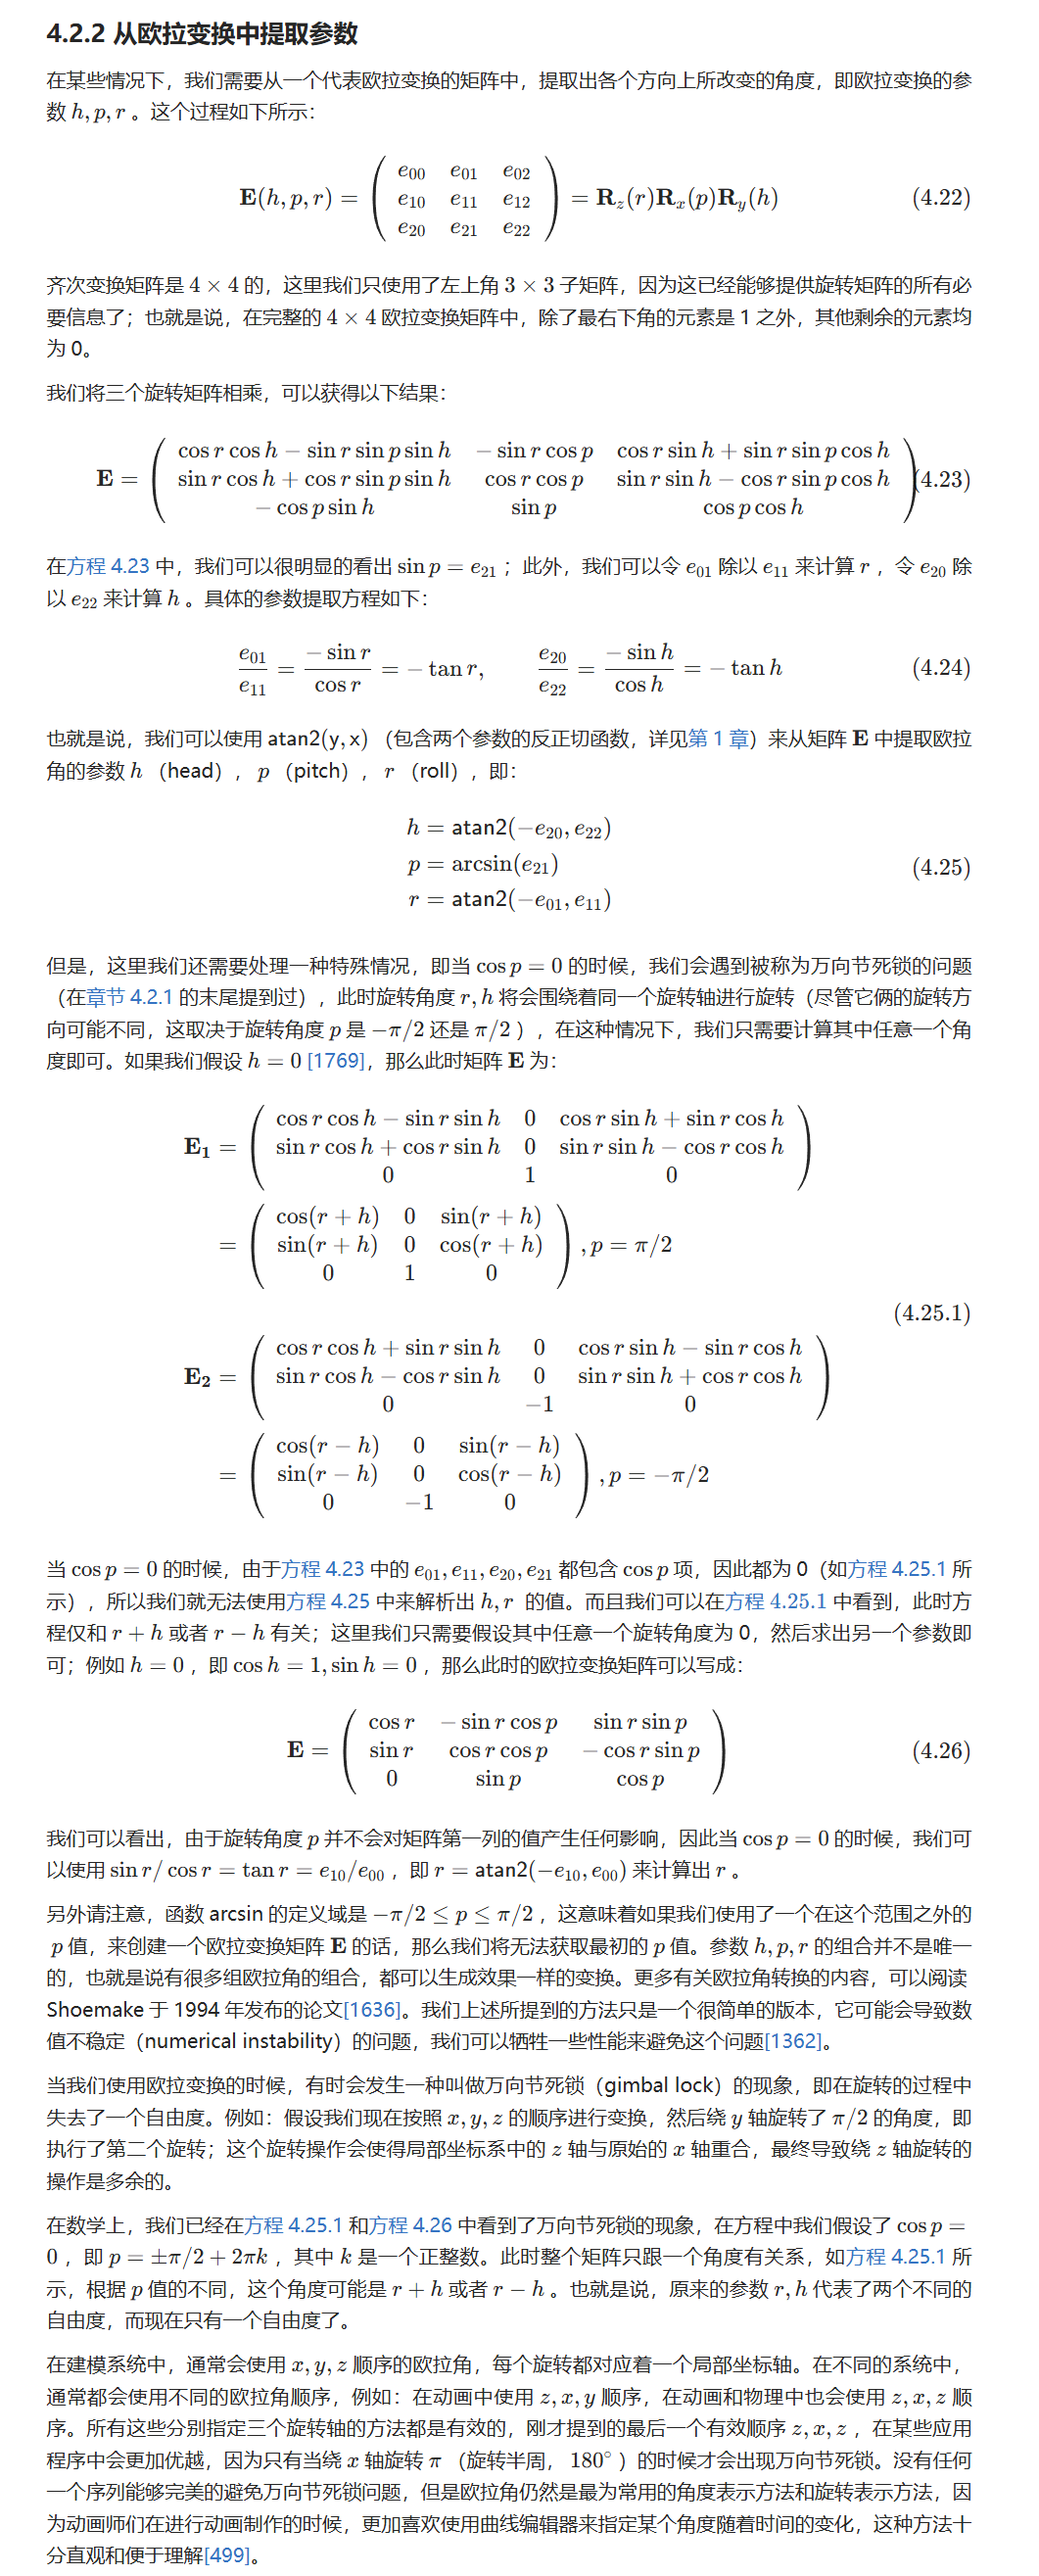
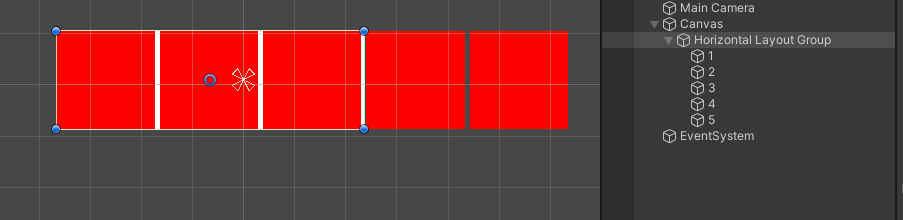
白色的是HorizontalLayoutGroup的RectTransform矩形,红色是子元素Recttransform矩形(5个)。 根据代码执行逻辑会先对子层级ILayoutElement(Image组件是实现ILayoutElement的)按1,2,3,4,5的顺序进行计算其长宽。然后执行ILayoutController,父层级的Horizontal Layout Group 会起作用,排列子子物体。 
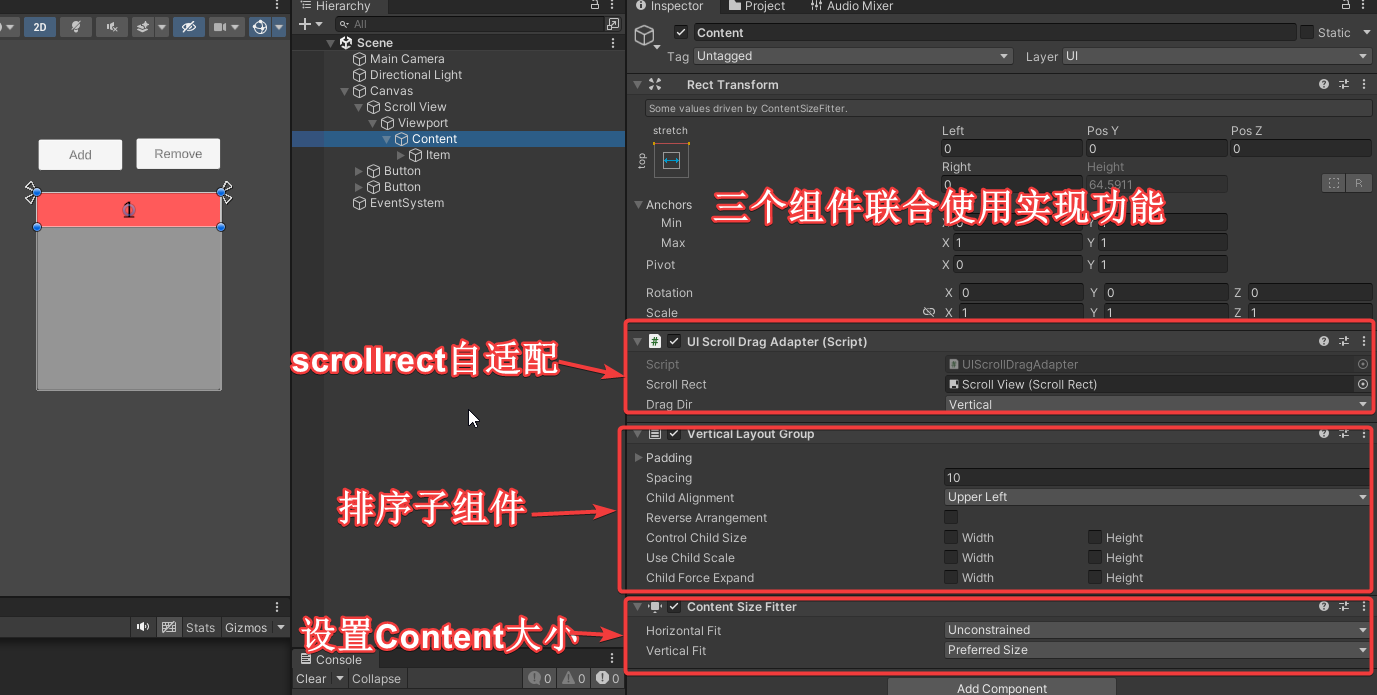
我们看到白色框是不会自己进行排列的,在开发中需要白色框的长度和子物体大小一样(也就是宽度是红色宽度的总和)的需求,怎么办? 可以添加一个ContentSizeFitter:ILayoutSelfController这个组件的作用正像他的实现接口名字一样设置自身。 父类白色框的宽度和红色框宽度保持一致了。 
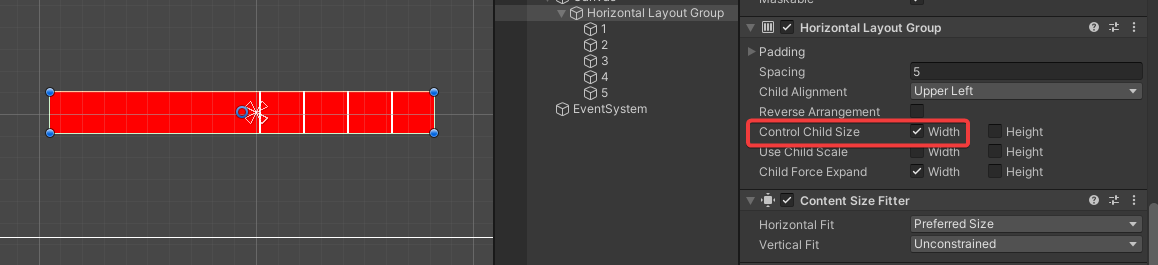
一些实用性的布局技巧,对Layout Group组件中的ControlChildSize的解释 
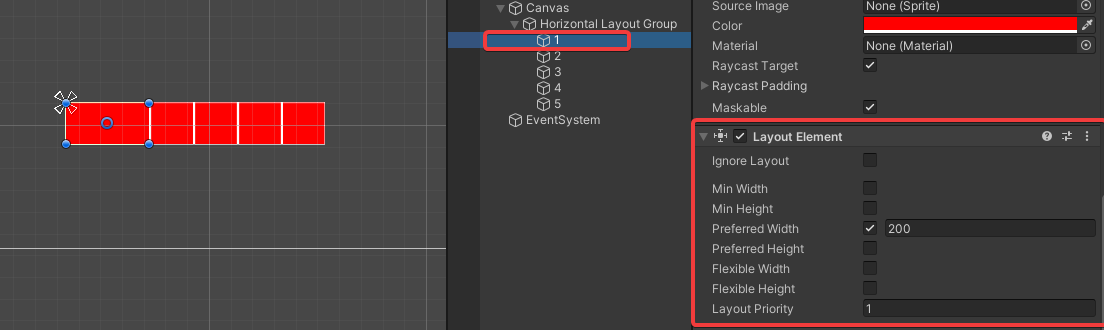
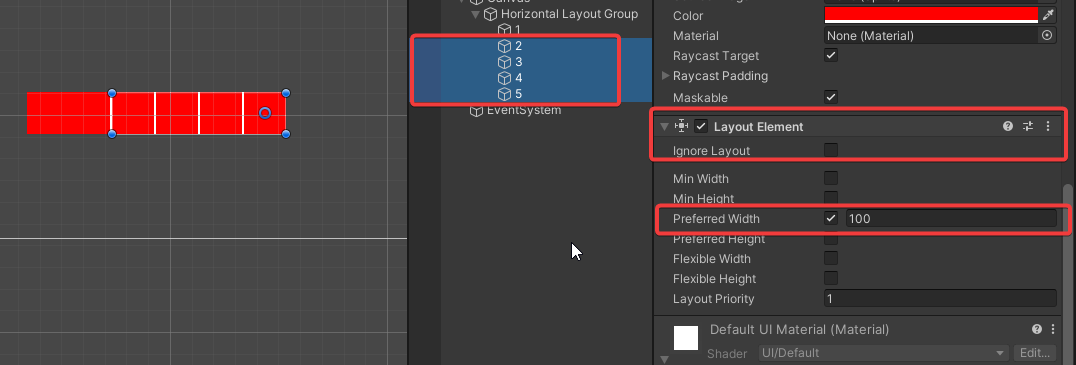
勾选ControlChildSize。会使用子类的LayoutElement中的布局熟悉(width height等),下图希望子物体中1的宽度200,2~5宽度100,参考以下设置:

代码解析:

LayoutElement组件,默认的UI组件Image,Text等都是实现ILayoutElement,可以利用ILayoutElement.layoutPriority,LayoutGroup和ContentSizeFitter在计算子对象或者自己with和hight时会按优先级生效。
LayoutUtility.cs
1
2
3
4
5
6
7
8
9
10
11
12
13
14
15
16
17
18
19
20
21
22
23
24
25
26
27
28
29
30
31
32
33
34
35
36
37
38
39
40
41
42
43
44
45
46
47
48
49
50
51
52
53
/// <summary>
/// Gets a calculated layout property for the layout element with the given RectTransform.
/// </summary>
/// <param name="rect">The RectTransform of the layout element to get a property for.</param>
/// <param name="property">The property to calculate.</param>
/// <param name="defaultValue">The default value to use if no component on the layout element supplies the given property</param>
/// <param name="source">Optional out parameter to get the component that supplied the calculated value.</param>
/// <returns>The calculated value of the layout property.</returns>
public static float GetLayoutProperty(RectTransform rect, System.Func<ILayoutElement, float> property, float defaultValue, out ILayoutElement source)
{
source = null;
if (rect == null)
return 0;
float min = defaultValue;
int maxPriority = System.Int32.MinValue;
var components = ListPool<Component>.Get();
rect.GetComponents(typeof(ILayoutElement), components);

for (int i = 0; i < components.Count; i++)
{
var layoutComp = components[i] as ILayoutElement;
if (layoutComp is Behaviour && !((Behaviour)layoutComp).isActiveAndEnabled)
continue;

int priority = layoutComp.layoutPriority;
// If this layout components has lower priority than a previously used, ignore it.
if (priority < maxPriority)
continue;
float prop = property(layoutComp);
// If this layout property is set to a negative value, it means it should be ignored.
if (prop < 0)
continue;

// If this layout component has higher priority than all previous ones,
// overwrite with this one's value.
if (priority > maxPriority)
{
min = prop;
maxPriority = priority;
source = layoutComp;
}
// If the layout component has the same priority as a previously used,
// use the largest of the values with the same priority.
else if (prop > min)
{
min = prop;
source = layoutComp;
}
}

ListPool<Component>.Release(components);
return min;
}
上述代码是关于ILayoutElement的优先级,当一个组件包含多个LayoutElement到底使用哪个的解释。
HorizontalOrVerticalLayoutGroup.cs
1
2
3
4
5
6
7
8
9
10
11
12
13
14
15
16
17
18
19
private void GetChildSizes(RectTransform child, int axis, bool controlSize, bool childForceExpand,
out float min, out float preferred, out float flexible)
{
if (!controlSize)
{
min = child.sizeDelta[axis];
preferred = min;
flexible = 0;
}
else
{
min = LayoutUtility.GetMinSize(child, axis);
preferred = LayoutUtility.GetPreferredSize(child, axis);
flexible = LayoutUtility.GetFlexibleSize(child, axis);
}

if (childForceExpand)
flexible = Mathf.Max(flexible, 1);
}
上述代码是LayoutGroup布局子物体是调用HorizontalOrVerticalLayoutGroup.GetChildSize()方法中实现,controlSize必须为True才生效

关于ContentSizeFitter控制自身的LayoutElement
具体在ContentSizeFitter.HandleSelfFittingAlongAxis(int axis)实现的

ContentSizeFitter.cs
1
2
3
4
5
6
7
8
9
10
11
12
13
14
15
16
17
18
19
20
21
22
23
24
25
26
27
/// <summary>
/// Calculate and apply the horizontal component of the size to the RectTransform
/// </summary>
public virtual void SetLayoutHorizontal()
{
m_Tracker.Clear();
HandleSelfFittingAlongAxis(0);
}

private void HandleSelfFittingAlongAxis(int axis)
{
FitMode fitting = (axis == 0 ? horizontalFit : verticalFit);
if (fitting == FitMode.Unconstrained)
{
// Keep a reference to the tracked transform, but don't control its properties:
m_Tracker.Add(this, rectTransform, DrivenTransformProperties.None);
return;
}

m_Tracker.Add(this, rectTransform, (axis == 0 ? DrivenTransformProperties.SizeDeltaX : DrivenTransformProperties.SizeDeltaY));

// Set size to min or preferred size
if (fitting == FitMode.MinSize)
rectTransform.SetSizeWithCurrentAnchors((RectTransform.Axis)axis, LayoutUtility.GetMinSize(m_Rect, axis));
else
rectTransform.SetSizeWithCurrentAnchors((RectTransform.Axis)axis, LayoutUtility.GetPreferredSize(m_Rect, axis));
}

点评

1、尽管将一个系统分割成许多对象通常可以增加其可复用性,但是对象间相互连接的激增又会降低其可复用性了。
2、通过中介者对象,可以将系统的网状结构变成以中介者为中心的星形结构,每个具体对象不再通过直接的联系与另一个对象发生相互作用,而是通过‘中介者’对象与另一个对象发生相互作用。中介者对象的设计,使得系统的结构不会因为新对象的引入造成大量的修改工作
如下图两个图是中介者模式的应用场景:
↓↓↓↓↓↓↓

点评

用了解释器模式,就意味着可以很容易地改变和扩展文法,因为该模式使用类来表示文法规则,你可使用继承来改变或扩展该文法。也比较容易实现文法,因为定义抽象语法树中各个节点的类的实现大体类似,这些类都易于直接编写.

点评

1、访问者模式适用于数据结构相对稳定的系统,它把数据结构和作用于结构上的操作之间的耦合解脱开,使得操作集合可以相对自由地演化,访问者模式的目的是要把处理从数据结构分离出来.
2、访问者模式的优点就是增加新的操作很容易,因为增加新的操作就意味着增加一个新的访问者。访问者模式将有关的行为集中到一个访问者对象中.
3、那访问者的缺点其实也就是使增加新的数据结构变得困难了


大多时候你并不需要访问者模式,但当一旦你需要访问者模式时,那就是真的需要它了.

GOF设计模式
0%